奥丁9
奥丁9
后端
数据库
redis
mysql
mongoDB
达梦
php
laravel
laravel-admin
dcat
表单
表格
java
spring
python
go
c
c++
前端
vue
nodejs
sass/less
html/css
前端框架
javascript
微信生态
公众号
小程序
uniapp
typescript
其他
AI
数据结构
安全
linux
seo
git
健身
算法
正则表达式
docker
待分类
后端
/
php
/
laravel
laravel扩展:xlswriter导出,自定义复杂合并及样式
1年前
aoding9
114
php
laravel
包
## 简介 laravel扩展:xlswriter导出 之前用了laravel-excel做数据导出,很耗内存速度也慢,数据量大的时候内存占用容易达到php上限,或者响应超时,换成xlswriter这个扩展来做。 由于直接导出的表格不太美观,经常需要进行合并单元格和自定义表格样式等操作,我对此进行了一些封装,使用更加方便直观。 ## 导出时间和内存占用情况 以下测试使用了扩展中的Demo`Aoding9\Laravel\Xlswriter\Export\Demo\AreaExport`导出areas地区表,有4列,使用分页查询,包括了数据查询的时间。 **chunkSize=2000,导出1万条** 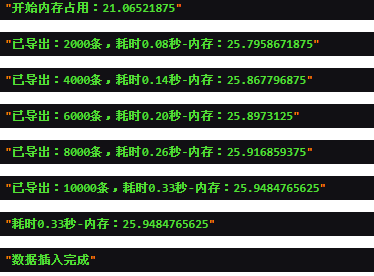 **chunkSize=50000 导出50万条** 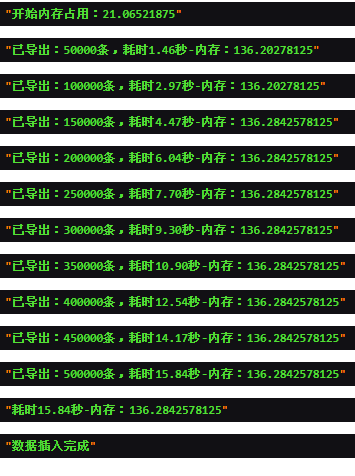 ## 效果示例 **导出类简单示例**   **自定义组装数据集合(2种方法)** 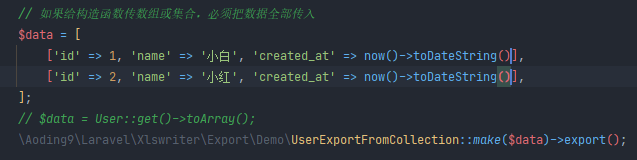 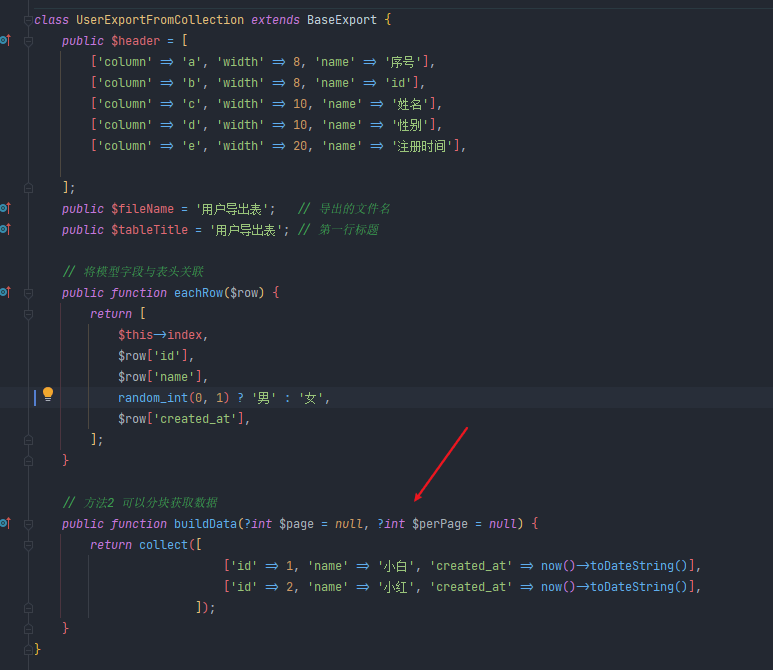 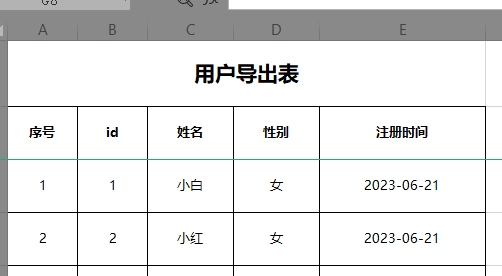 **复杂合并及指定单元格样式** 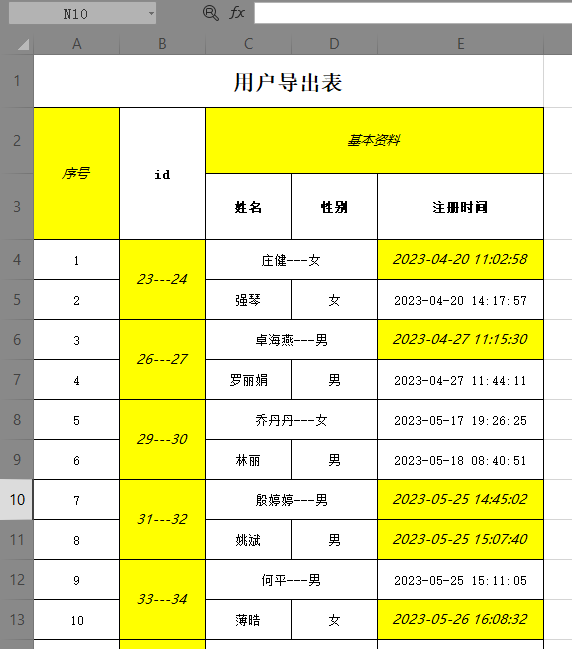 ## 安装 首先根据xlswriter文档安装扩展,windows可以下载对应php版本的dll文件,linux可以源码编译安装,或者pecl安装 官方文档:https://xlswriter-docs.viest.me/ 修改php.ini后,在phpinfo中确认是否安装成功,然后进行下一步 `composer require aoding9/laravel-xlswriter-export` 若国内composer镜像安装失败,请设置官方源 `composer config repo.packagist composer https://packagist.org` 官方源下载慢,国内镜像偶尔出问题可能导致安装失败,也可以把以下代码添加到composer.json,直接从github安装 如果无法访问github,可以将url改为gitee:`https://gitee.com/aoding9/laravel-xlswriter-export` ```json { "repositories": [ { "type": "vcs", "url": "https://github.com/aoding9/laravel-xlswriter-export" } ] } ``` ## 配置 在导出类中定义BaseExport的相关属性进行配置,或者在make之后调用相关属性的set方法 ## 使用 ### 1.定义导出类 #### 简单导出 使用预定义的格式进行导出,最少只需定义表头和数据到列的关联,即可导出一个比较美观的表格。 以用户导出为例,首先创建一个UserExport导出类,继承`Aoding9\Laravel\Xlswriter\Export\BaseExport`基类,一般放在app\Exports目录下 `$header`中,column是列名,按abcd顺序排列,仅作为标识不参与实际导出,列很多时方便一眼看出列名,防止写错位,觉得麻烦不写也可以,width是列宽,name是填充的表头文本。 若要合并表头,需定义最细分的列以指明每一列的宽度,合并列在另外的方法中去处理。 `/** @var \App\Models\User $row */`告诉编辑器$row可能是User模型,输入`$row->`弹出模型的属性提示,需要配合`barryvdh/laravel-ide-helper`扩展生成`_ide_helper_models.php`文件,方便开发,可用可不用 ```php <?php namespace Aoding9\Laravel\Xlswriter\Export\Demo; use Aoding9\Laravel\Xlswriter\Export\BaseExport; class UserExport extends BaseExport { public $header = [ ['column' => 'a', 'width' => 8, 'name' => '序号'], ['column' => 'b', 'width' => 8, 'name' => 'id'], ['column' => 'c', 'width' => 10, 'name' => '姓名'], ['column' => 'd', 'width' => 10, 'name' => '性别'], ['column' => 'e', 'width' => 20, 'name' => '注册时间'], ]; public $fileName = '用户导出表'; // 导出的文件名 public $tableTitle = '用户导出表'; // 第一行标题 // 将模型字段与表头关联 public function eachRow($row) { /** @var \App\Models\User $row */ return [ $this->index, $row->id, \Faker\Factory::create('zh_CN')->name, random_int(0, 1) ? '男' : '女', $row->created_at->toDateTimeString(), ]; } } ``` #### 使用自定义的数组或集合 如果不希望使用查询构造器获取数据,比如从接口获取数据,有2种方式使用自己定义的数据集合。 > 注意: 如果数据是普通数组或集合,而非ORM模型集合,那么eachRow中不能直接用`$row->id`获取数据,应该使用`$row['id']` 方式1、将集合或数组传给构造函数,弊端是需要传入全部数据,无法分块;好处是写法简单,数据在外部定义,适合数据量小的导出 ```php $data = [ ['id' => 1, 'name' => '小白', 'created_at' => now()->toDateString()], ['id' => 2, 'name' => '小红', 'created_at' => now()->toDateString()], ]; // $data = User::get()->toArray(); \Aoding9\Laravel\Xlswriter\Export\Demo\UserExportFromCollection::make($data)->export(); \Aoding9\Laravel\Xlswriter\Export\Demo\AreaExportFromCollection::make(\App\Models\Area::query()->limit(500000)->get())->export(); ``` **不使用分页获取,直接导50万条数据的集合,因为要一次保存全部数据,所以内存占用极高**  方式2、构造函数传参留空,在导出类中重写buildData方法,分页返回集合,适合数据量大的情况 ```php \Aoding9\Laravel\Xlswriter\Export\Demo\UserExportFromCollection::make()->export(); ``` ```php <?php namespace Aoding9\Laravel\Xlswriter\Export\Demo; use Aoding9\Laravel\Xlswriter\Export\BaseExport; class UserExportFromCollection extends BaseExport { public $header = [ ['column' => 'a', 'width' => 8, 'name' => '序号'], ['column' => 'b', 'width' => 8, 'name' => 'id'], ['column' => 'c', 'width' => 10, 'name' => '姓名'], ['column' => 'd', 'width' => 10, 'name' => '性别'], ['column' => 'e', 'width' => 20, 'name' => '注册时间'], ]; public $fileName = '用户导出表'; // 导出的文件名 public $tableTitle = '用户导出表'; // 第一行标题 // 将模型字段与表头关联 public function eachRow($row) { return [ $this->index, $row['id'], $row['name'], random_int(0, 1) ? '男' : '女', $row['created_at'], ]; } // 方法2 可以分块获取数据 public function buildData(?int $page = null, ?int $perPage = null) { return collect([ ['id' => 1, 'name' => '小白', 'created_at' => now()->toDateString()], ['id' => 2, 'name' => '小红', 'created_at' => now()->toDateString()], ]); } } ``` #### 复杂合并单元格,指定单元格样式 在每个分块插入之前,每行的数据会被绑定一个index值,在每行插入后,会回调`afterInsertEachRowInEachChunk()`,在其中可以使用`getCurrentLine`获取当前行数,使用 `getRowByIndex()`获取分块中index对应的rowData `setHeaderData()` 设置表头数据,重写可修改预定义的表头、标题等 `$this->excel`是xlswriter的Excel实例,可以使用`$this->excel->mergeCells`合并单元格,此时可以指定自定义样式,样式设置方法请参考官方文档。 `afterInsertData()`是所有数据插入完成后的回调,默认在其中调用了`mergeCellsAfterInsertData`方法,合并标题,合并表头,或者对整个表格进行最后修改。可以用于整个的纵向合并,如`A1:A100`,还可以设置打印纸张大小方向,设置文档密码保护等,参考xlswriter文档即可。 `insertCellHandle()`是插入单元格数据的处理方法,重写后可实现设置特定单元格的样式,或者对特定单元格插入公式、图片等 `getCellName()`可以根据传入的行数和列数,返回单元格名称,配合insertCellHandle,可判断当前写入的单元格 ```php <?php namespace Aoding9\Laravel\Xlswriter\Export\Demo; use Aoding9\Laravel\Xlswriter\Export\BaseExport; use Illuminate\Support\Carbon; use Vtiful\Kernel\Format; class UserMergeExport extends BaseExport { public $header = [ ['column' => 'a', 'width' => 10, 'name' => '序号'], ['column' => 'b', 'width' => 10, 'name' => 'id'], ['column' => 'c', 'width' => 10, 'name' => '姓名'], ['column' => 'd', 'width' => 10, 'name' => '性别'], ['column' => 'e', 'width' => 20, 'name' => '注册时间'], ]; public function getGender() { return random_int(0, 1) ? '男' : '女'; } // 处理每行的模型,使其对应到表头 public function eachRow($row) { return [ $this->index, // 自增序号,绑定在模型中 $row->id, \Faker\Factory::create('zh_CN')->name, $this->getGender(), $row->created_at, ]; } public $fileName = '用户导出表'; // 导出的文件名 public $tableTitle = '用户导出表'; // 第一行标题 public $useFreezePanes = false; // 是否冻结表头 public $fontFamily = '宋体'; public $rowHeight = 30; // 行高 public $titleRowHeight = 40; // 首行大标题行高 public $headerRowHeight = 50; // 表头行高 public $useGlobalStyle=false; // 是否用全局默认样式代替列默认样式(为ture时,数据末尾行下方没有边框,但是速度会慢一点点) /** * @Desc 在分块数据插入每行后回调(到下一个分块,则上一分块被销毁) * @param $row */ public function afterInsertEachRowInEachChunk($row) { // 奇数行进行合并,且不合并到有效数据行之外 if ($this->index % 2 === 1 && $this->getCurrentLine() < $this->completed + $this->startDataRow) { // 定义纵向合并范围,范围形如"B1:B2" $range1 = "B" . $this->getCurrentLine() . ":B" . ($this->getCurrentLine() + 1); $nextRow = $this->getRowInChunkByIndex($this->index + 1); $ids = $row->id . '---' . ($nextRow ? $nextRow->id : null); // mergeCells(范围, 数据, 样式) ,通过第三个参数可以设置合并单元格的字体颜色等 $this->excel->mergeCells($range1, $ids, $this->getSpecialStyle()); // 横向合并,形如"C3:D3" $range2 = "C" . $this->getCurrentLine() . ":D" . $this->getCurrentLine(); $nameAndGender = $row->name . "---" . $this->getGender(); $this->excel->mergeCells($range2, $nameAndGender); } } public function setHeaderData() { parent::setHeaderData(); // 把表头放到第三行,第二行留空用于合并 $this->headerData->put(2, $this->headerData->get(1)); $this->headerData->put(1, []); return $this; } /** * @Desc 插入数据完成后进行合并 * @return array[] */ public function mergeCellsAfterInsertData() { // range是合并范围,$this->end是末尾的列名字母,formatHandle指定合并单元格的样式 return [ ['range' => "A1:{$this->end}1", 'value' => $this->getTableTitle(), 'formatHandle' => $this->titleStyle], ['range' => "A2:A3", 'value' => '序号', 'formatHandle' => $this->getSpecialStyle()], ['range' => "B2:B3", 'value' => 'id', 'formatHandle' => $this->headerStyle], ['range' => "C2:E2", 'value' => '基本资料', 'formatHandle' => $this->getSpecialStyle()], ]; } public $specialStyle; /** * 定义个特别的表格样式 * @return resource */ public function getSpecialStyle() { return $this->specialStyle ?: $this->specialStyle = (new Format($this->fileHandle)) ->background(Format::COLOR_YELLOW) ->fontSize(10) ->border(Format::BORDER_THIN) ->italic() ->font('微软雅黑') ->align(Format::FORMAT_ALIGN_CENTER, Format::FORMAT_ALIGN_VERTICAL_CENTER) ->wrap() ->toResource(); } // public $specialStyle2; // public function getSpecialStyle2() {} /** * @Desc 重写插入单元格数据的处理方法,可单独设置某个单元格的样式 * @param int $currentLine 单元格行数 * @param int $column 单元格列数 * @param mixed $data 插入的数据 * @param string|null $format 数据格式化 * @param resource|null $formatHandle 表格样式 * @return \Vtiful\Kernel\Excel */ public function insertCellHandle($currentLine, $column, $data, $format, $formatHandle) { // if($this->getCellName($currentLine,$column)==='A4'){ ... } // 根据单元格名称判断 // 筛选出E列,且日期秒数为偶数的单元格 if ($this->getColumn($column) === 'E' && $data instanceof Carbon) { if ($data->second % 2 === 0) { // 设置为上面定义好的样式(黄色背景,斜体,微软雅黑,水平垂直居中等) $formatHandle = $this->getSpecialStyle(); } $data = $data->toDateTimeString(); } return $this->excel->insertText($currentLine, $column, $data, $format, $formatHandle); } } ``` ### 2、在控制器中使用 ```php public function exportModels() { // 定义查询构造器,设置查询条件,如果有关联关系,使用with预加载以优化查询 $query=\App\Models\User::query(); // 将查询构造器传入构造函数,然后调用export即可触发下载 \Aoding9\Laravel\Xlswriter\Export\Demo\UserExport::make($query)->export(); // 合并单元格的demo \Aoding9\Laravel\Xlswriter\Export\Demo\UserMergeExport::make($query)->export(); // 用数据集合或数组 // 方式1:如果给构造函数传数组或集合,必须把数据全部传入 $data = [ ['id' => 1, 'name' => '小白', 'created_at' => now()->toDateString()], ['id' => 2, 'name' => '小红', 'created_at' => now()->toDateString()], ]; // $data = \App\Models\User::get()->toArray(); \Aoding9\Laravel\Xlswriter\Export\Demo\UserExportFromCollection::make($data)->export(); // 方式2:无需传参给构造函数,但需要重写buildData方法,分块返回数据 \Aoding9\Laravel\Xlswriter\Export\Demo\UserExportByCollection::make()->export(); // 地区导出的demo // 用于调试模式查看运行耗时,包含数据查询耗费的时间 $time =microtime(true); // 用查询构造器 $query=\App\Models\Area::where('parent_code',0); // 查父级为0的地区,即查省份 \Aoding9\Laravel\Xlswriter\Export\Demo\AreaExport::make($query,$time)->export(); // 用数组或集合 // 数据量大时占用很高,需要修改内存上限,不推荐 ini_set('memory_limit', '2048M'); set_time_limit(0); $data =\App\Models\Area::query()->limit(500000)->get(); \Aoding9\Laravel\Xlswriter\Export\Demo\AreaExportFromCollection::make($data,$time)->export(); } ``` ### 3、通过swoole使用 由于swoole中不能调用`exit()`方法,需要在控制器中直接return下载响应 为此,需要在导出类中将`$useSwoole`属性设为true,然后在控制器中return导出类的export()返回值 ```php // UserExport public $useSwoole = true; // UserController return UserExport::make()->export(); ``` ## 其他 合并单元格的范围请使用大写字母,小写字母会报错。 如果eachRow中需要调用关联模型,请使用with预加载以优化查询。 仓库中包含几个导出类的demo,如果你已有users表或者areas表,可以尝试使用demo进行导出测试 为了方便自定义排版和修改数据,基类属性和方法都为public,方便子类重写 ## 方法属性补充介绍 `useFreezePanes()`是否启用表格冻结功能 `freezePanes()`设置表格冻结的行列 `getColumn()` 传入列数得到对应字母 `getColumnIndexByName()` 根据字母列名得到列数 `store()` 保存到文件,export里面主要是这个方法 `shouldDelete()` 设置下载后是否删除文件 `export()` 导出一条龙,保存文件->下载->下载后删除文件 `$startDataRow` 数据开始的行数 `$currentLine` 当前插入数据行,第一行为0,excel显示的行数需要再此基础上+1 `getCurrentLine()` 返回$currentLine+1 `$index` 数据行的序号,不包括表头 `getIndex()` 返回$index `getRowInChunkByIndex()` 根据序号获取rowData,分块时会被销毁 `$chunkData` 分块数据 `$max和setMax()`设置最大导出数据量 `setUseTitle()` 是否使用标题行(插入第一行的合并标题) `$chunkSize和setChunkSize()`设置每个分块的数据量 `$debug和setDebug()` 用dump()输出每个分块导出后的内存占用和耗费时间 `$completed` 已插入的数据量,用来计算导出的进度 `$dataSourceType` 根据构造函数的第一个参数,设置数据源类型,传入查询构造器Builder则为query类型,传入数组和集合为collection类型,其他情况为other类型 `initDataSource()` 初始化数据源,重写以扩展自己的类型 `buildData()` 根据数据源类型,执行对应的方法获取数据 `buildDataFromQuery() buildDataFromCollection() buildDataFromOther()` 重写后可以实现你自己的数据获取方法 `chunk()` 分块处理方法 `$this->excel->mergeCells()` 合并单元格 `$headerLen` 表头长度 `count($this->getHeader())` `$end` 获取最后一列的字母 `$this->getColumn($this->headerLen - 1)` `$useSwoole` 是否使用了swoole 更多方法详见BaseExport,注释非常详细 有什么建议或者问题,欢迎留言讨论 ## 版本更新 - v1.2.1 (2023-6-30) - 数据源新增other类型,非query/array/collection则均为other - 新增buildDataFromOther,当数据源为other类型时,buildData会调用它,重写以返回自定义数据集合 - 构造函数现在数据源默认为null,即other类型。 - $useGlobalStyle现在默认为true,使用全局默认样式代替列默认样式,效果是数据末尾行之后不再有边框。 - v1.2.2 (2023-9-16) - download时调用`$this->useSwoole()`判断是否使用了swoole,如果使用了,将返回下载响应,代替默认的exit()
本作品采用
《CC 协议》
,转载必须注明作者和本文链接